Installation
|
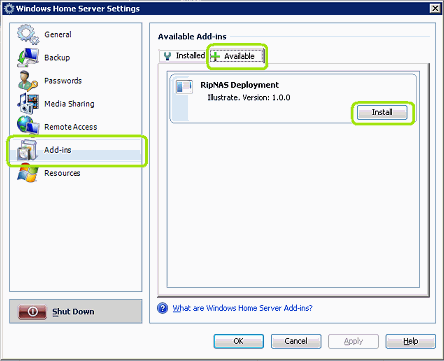
Typically RipNAS Essentials is installed by downloading the install to a PC on the network, copying it to Windows Home Server machine and installing through the Windows Home Server Connector:
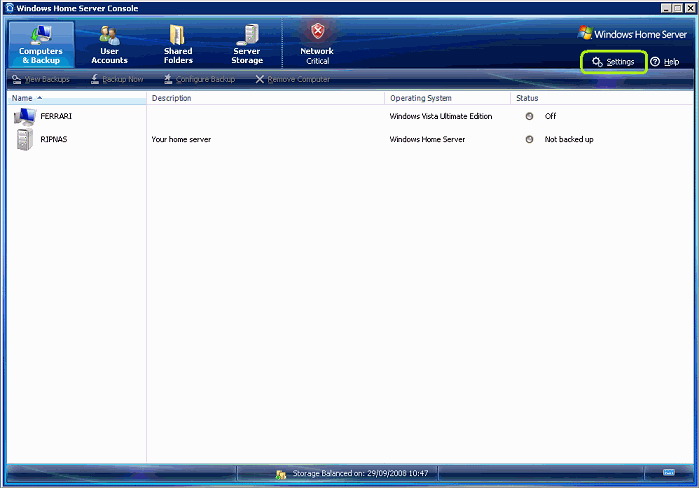
Start Windows Home Server Console and click Settings:
|
 RipNAS Teac Drive (on HP Media Smart) |
|
RipNAS operates 100% without the need for 'eyes on' interaction, at the same time RipNAS integrates into the Windows Home Server Console, allowing precise control over Ripping operations:

The main RipNAS status page is shown above: current disc shown at the top, CD drive ripping speed is shown in [ ] brackets.
Ripping Mode allows for silent ripping at x4 speed which renders the drive in-audible (requires x4 speed compatible drive such as Teac).
Operation
Upon inserting the CD, RipNAS fetches metadata from the Internet (using PerfectMeta: from AMG, GD3, Musicbrainz & freedb), if the disc is not present in any of the 4 online databases (very rare), the disc will be ejected after about 20 seconds. If the same disc is re-inserted it will be ripped to 'Unknown Artist x' and Track 1, Track 2, etc.
After ripping is completed a disc is ejected, if the same disc is re-inserted it will automatically be rejected (ejected without being re-ripped). Only the last disc ripped is remembered for possible next disc rejection.
Secure Ripping
When secure ripping is active (option on Settings page) tracks with unrecoverable errors are separated into a different folder (Music\_InSecure) and the disc will appear in the With Errors section. If the disc is present in AccurateRip's database, ripping can proceed as fast a unsecure (burst) ripping. Any disc not in the database will take 2x as long to rip as it is self verified.
Clicking View Log can be useful to see a detailed ripping report and helping diagnose issues.
Each secure mode ripped disc as an accuracy report appended after the album name, such as:
All (xx) Accurate: all tracks were verified as 100% without error using AccurateRip
All (xx) Secure: the disc was not present in AccurateRip, so instead the drive c2 pointers were use and a verification re-rip to check for error free.
xx Accurate, xx Insecure: some tracks had unrecoverable errors, see the folder
Music\_InSecure for the tracks with errors, if the disc is cleaned and re-ripped (a different CD would have to be ripped in-between) then there is a chance the errors can be recovered on a 2nd rip and the tracks would move from _InSecure to the correct folder.
|
Fine control of RipNAS is accessible through the Settings page:

On the settings page encoder (audio format) can be chosen, clicking Settings allows for fine control within the selected encoder. RipNAS comes preinstalled with the following encoders: FLAC, Wave, mp3, WMA (Lossless), Apple Lossless. In addition any supported dBpoweramp encoder can be installed. Also present is [Multi-Encoder] which allows two audio-formats to be encoded at the same time (for example a FLAC lossless archive along with an mp3 collection for use in a portable mp3 player). [Multi-Encoder] can be used also to use custom DSP effects. For trouble free mp3 encoding we recommend mp3 (Fraunhofer) be used.
DSP Effects & Actions each time audio is taken from a CD it is run through DSP effects, by default these effects are used:
ReplayGain - calculates a volume loudness which supported players (such as Logitech Duet) can use to level the volume.
Move Destination File on Error [secure models only] - detects a rip is not secure and moves the affected file to \_Insecure
RipNAS - Update (Squeezecenter...) - informs SqueezeCenter that there are newly ripped audio files for instant indexing. It is safe to use this effect even if SqueezeCenter is not installed.
Rip Path should be left as default so the files are shared onto the network.
Naming allows customization of the final naming and folder creation within the Music Folder, the default naming save audio tracks to:
\[artist]\[album]\[artist] - [track] - [title]
or for compilation CDs:
Various Artists\[album]\[track] [artist] - [title]
Ripping Mode is present only on Secure Teac models, switching between Burst and Secure ripping modes (detection and recovery of errors).
If Squeezebox or iTunes (Firefly) programs are installed on the system they can be configured and disabled if required.
|
Additional Encoders can be added to RipNAS by:
- From any PC on your network Run the program Remote Desktop Connection (Start >> Programs >> Accessories >> [Communications] ), when asked which computer name enter the WHS name, i.e. HPSERVER. After connecting login as 'Administrator' and your WHS administrator password.
- Open an Internet Explorer window on the WHS machine and browse to dbpoweramp.com >> Codec Central. Run the required install (first time click Add to add codecs.dbpoweramp.com to the trusted web site list, then Add >> Close, then re-click the install link).
- Codec is now installed and can be selected in the RipNAS Settings page.
|
Squeezeboxes are most suited to the default FLAC lossless audio format. Squeezeboxes require a media streaming application to be installed SqueezeCenter, if your WHS does not have SqueezeCenter it can be installed by following WHS SqueezeCenter Installation Instructions.
|
Sonos is suited to the default FLAC lossless audio format. Sonos can connect to a network share, from the Sonos Controller add a network share: \\[servername]\Music supply the user name Administrator and password used to setup the WHS box.
|
The built in Windows Home Server uPNP sharing can be used with a few tweaks:
- Switch RipNAS to write Windows Media Audio Lossless audio files: Windows Home Server Connector >> Settings >> RipNAS set Encoder to Windows Media Audio.
- Enable Audio Sharing: Windows Home Server Connector >> Settings >> Media Sharing set Music sharing to On.
- If your uPNP compatible device cannot play WMA Lossless, WHS will automatically convert to uncompressed PCM to ensure compatibility.